summary
Table Information allows you to edit the metadata associated with a table and view previews and renditions of the table.
In Table Information, you can switch between screens with the following four tabs.
- Table Information
- You can view and edit metadata in the table.
- Column Information
- You can view and edit the metadata for each column associated with the table.
- View summary statistics and data previews.
- Reference relationships between columns can be set manually.
- preview
- You can see a preview of the table.
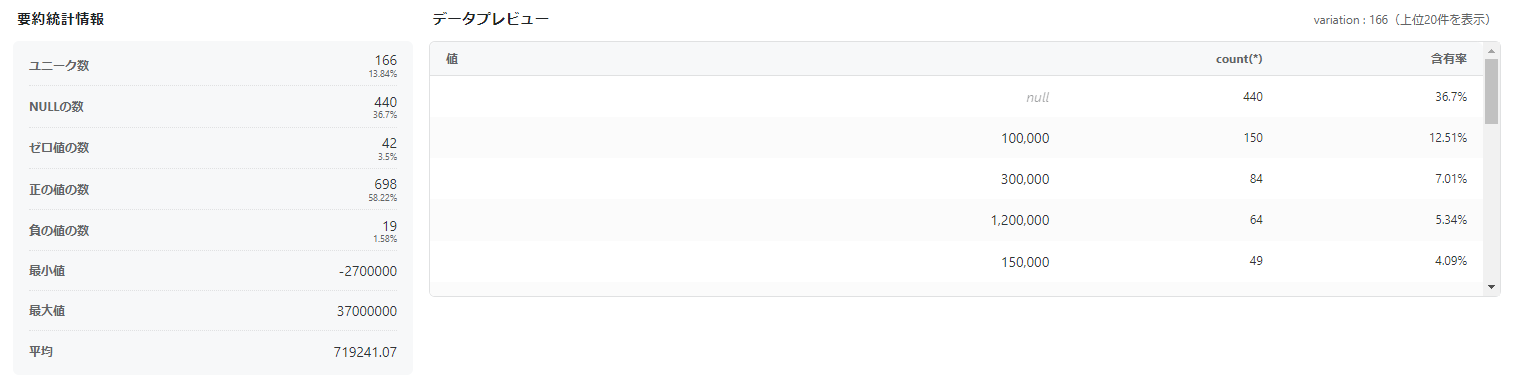
- Summary statistics for each column can be viewed.
- column lineage
- Visual confirmation of column linage.
Common screen
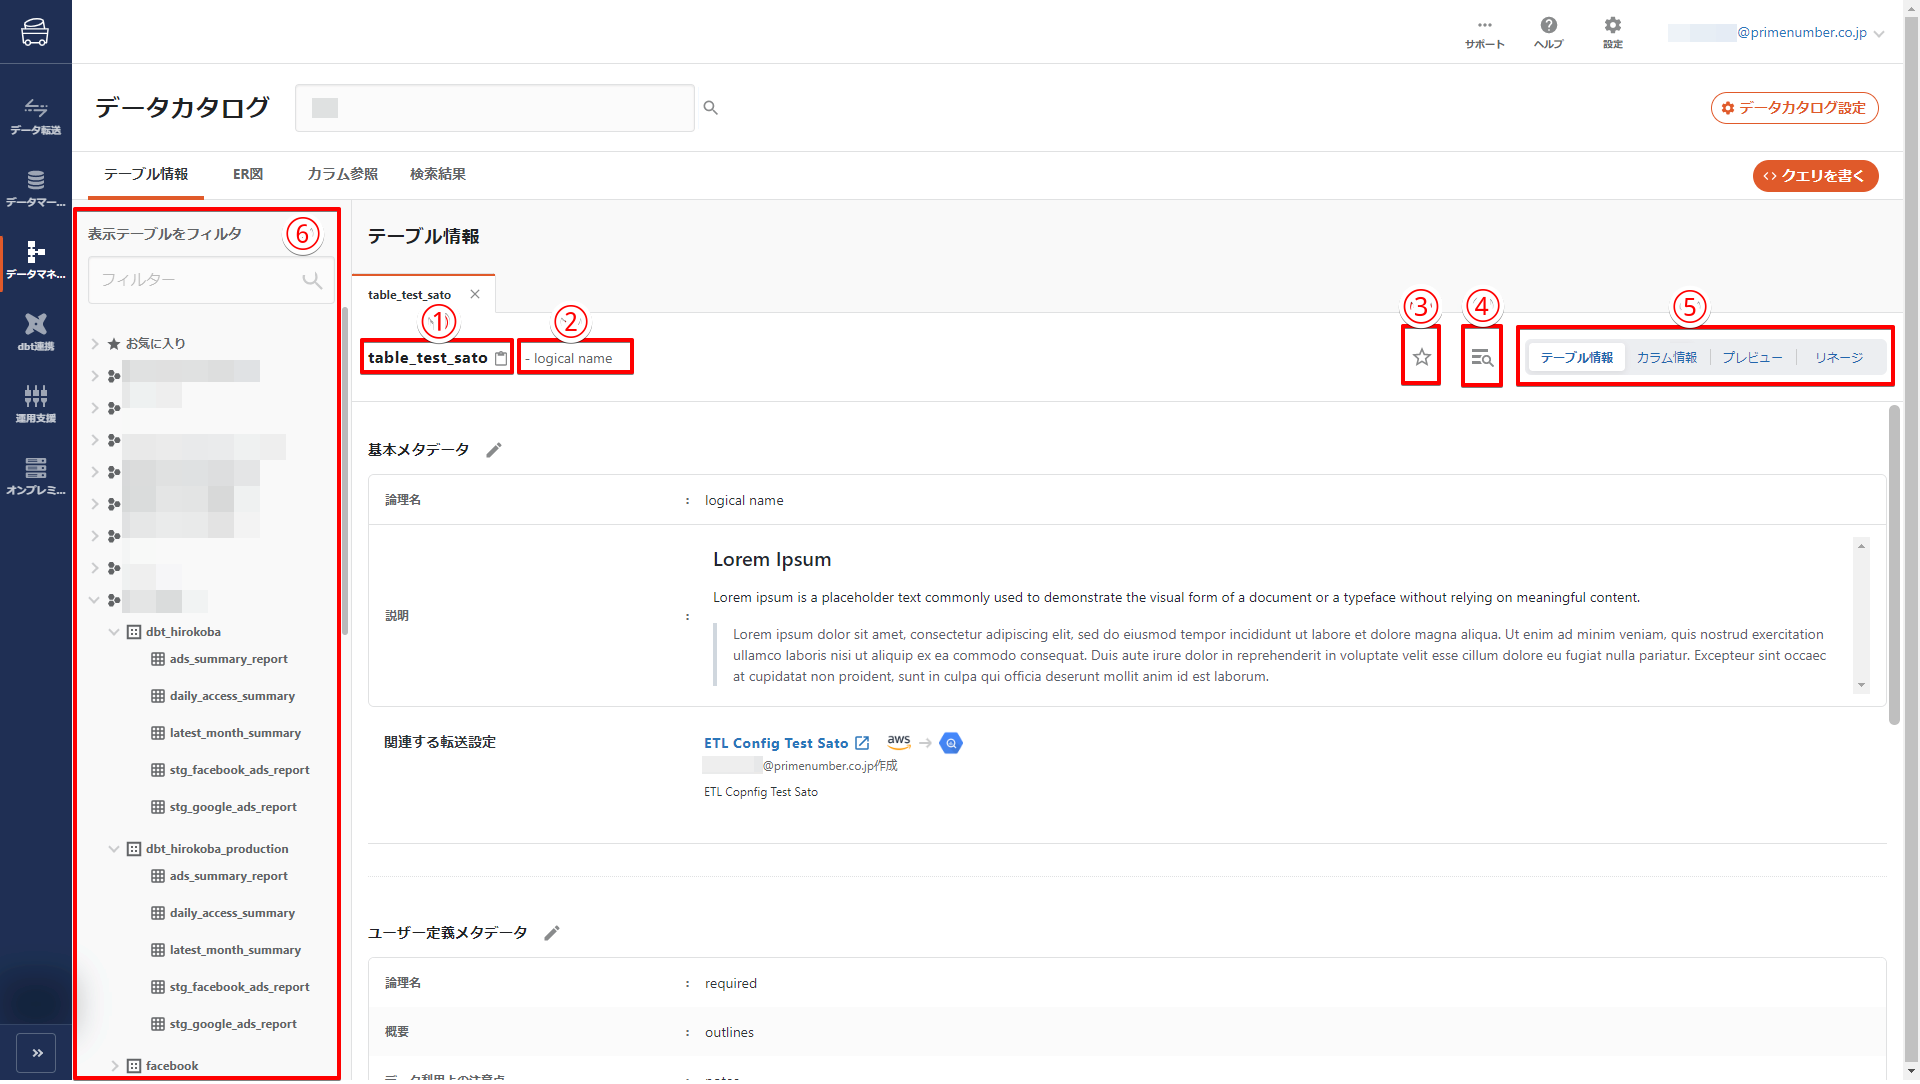
1. table name
The table name (physical name) is displayed.
2. logical name
The logical name of the table is displayed.
If no logical name is defined, nothing is displayed.
For more information about logical names, see logical names.
3. favorite button
Tables can be registered as favorites.
Tables registered as favorites are stored in the favorites in the table list.
4. query button
Launch Queriedita.
The table opened in the Table Info tab will be launched with the FROM clause specified.
5. screen switching
Switches the screen to be displayed.
6. table list
The table list is displayed.
Select the table for which you wish to edit or reference metadata.
Entering a filter will narrow the table.
Table Information
Displays metadata about the table.
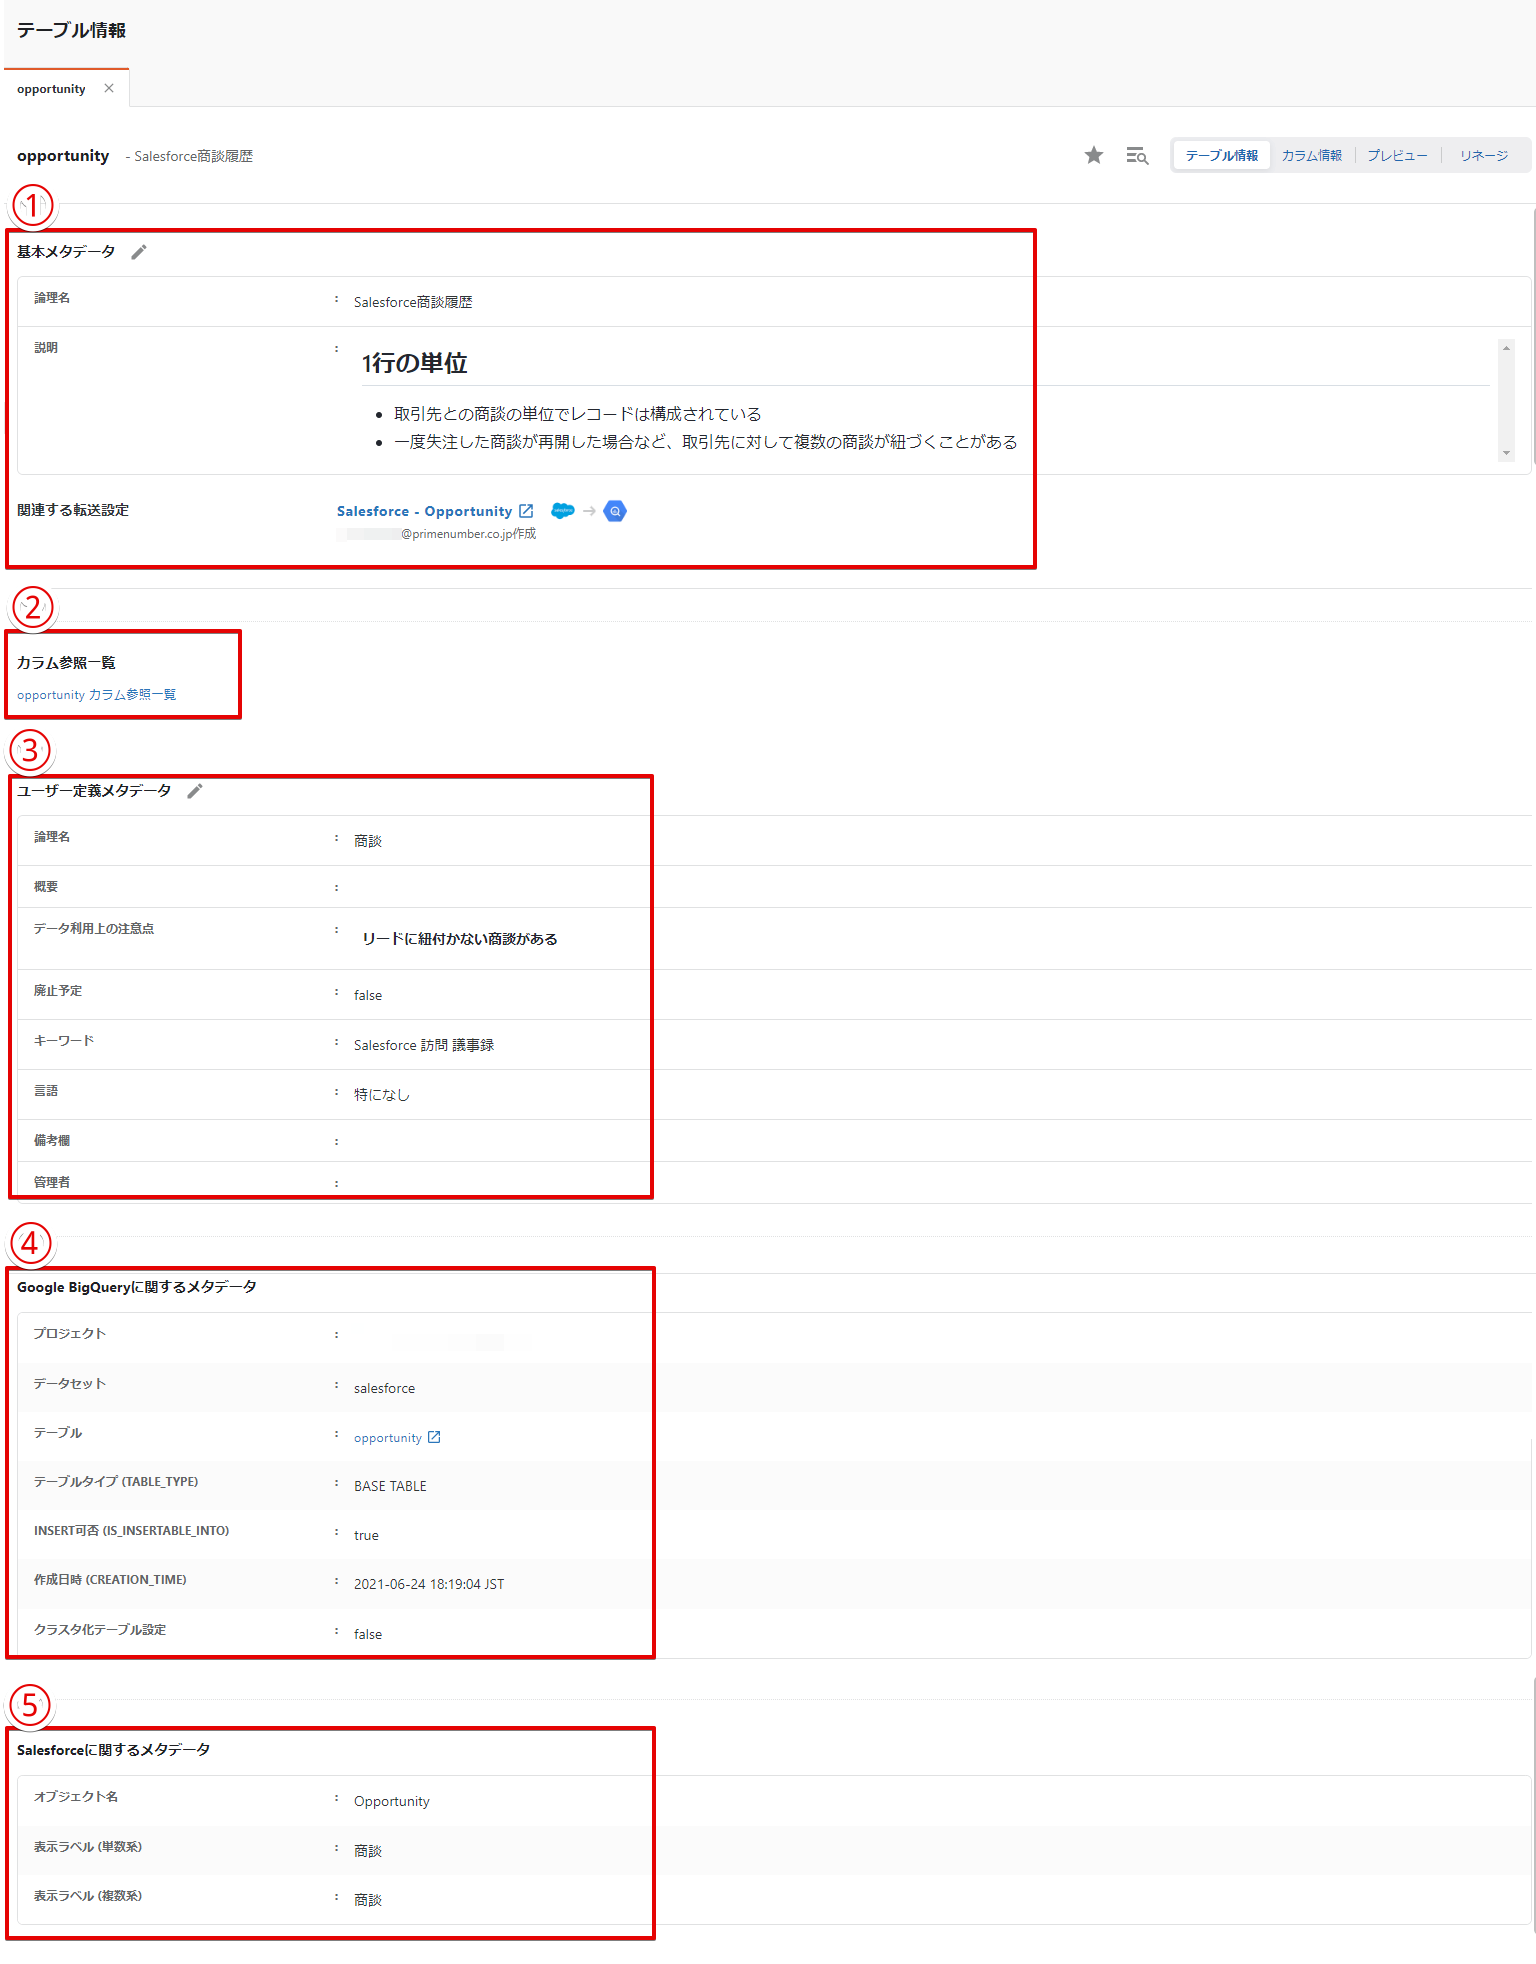
1. basic metadata
You can enter a logical name and****description.
We recommend that you enter information that will help identify the asset in the logical name and descriptive information about the asset in the description.
For more information about logical names, see logical names.
Related ETL Configuration and Data Mart
For tables that have been transferred or loaded using TROCCO, information on the ETL Configuration or Data Mart Configuration used will be displayed.
Clicking on the link will bring up the ETL Configuration Details screen.
2. link to column reference list
Clicking on the link will display a list of Column Setting references defined in the table in question.
User-defined metadata
Customers can enter and edit their own metadata in fields previously created in the template for user-defined metadata.
Metadata about the datastore
This metadata is obtained as a side effect of the automatic asset capture function.
Depending on your data store, the metadata items retrieved will vary.
For details on the metadata obtained from each data store, please refer to the metadata details about the data store.
Metadata about the data source
Metadata automatically acquired by the automatic metadata acquisition function.
For more information on the conditions under which this item appears, please refer to the metadata about the data source.
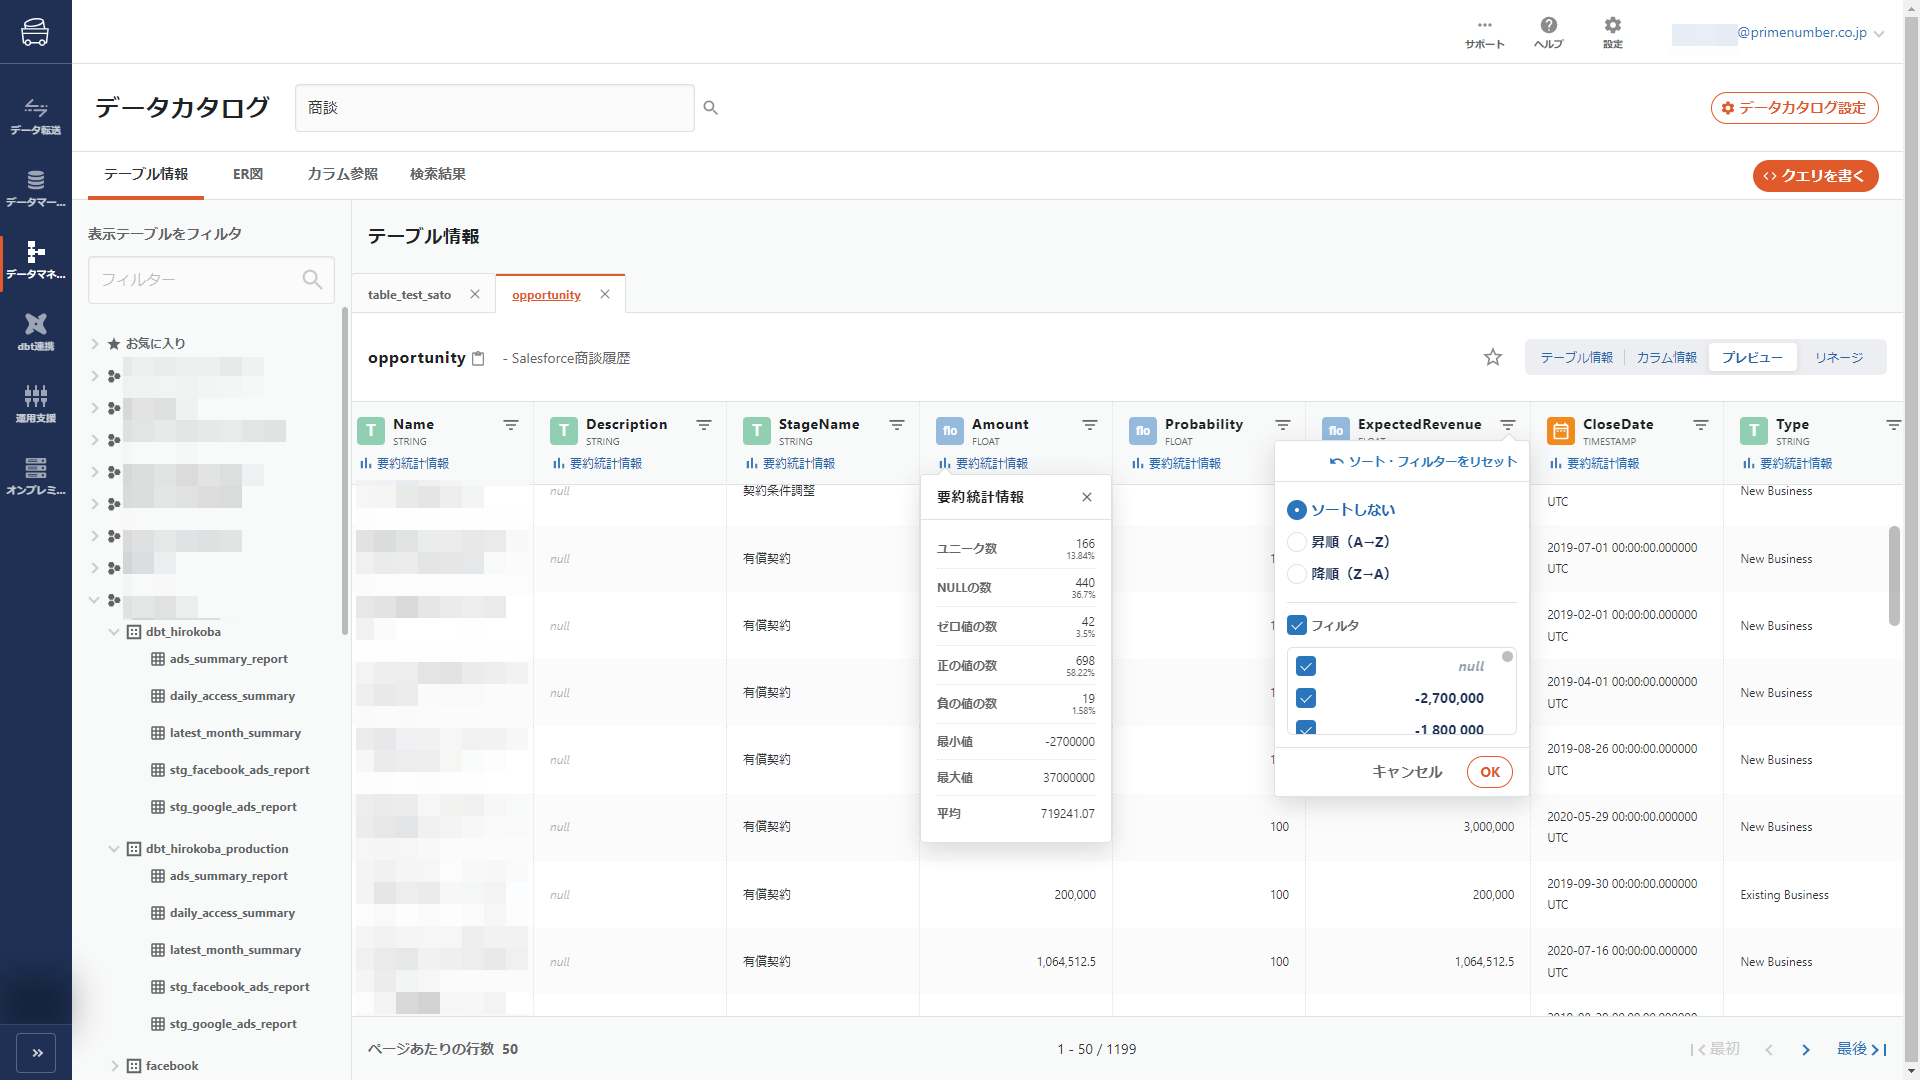
Column Information
Lists the columns contained in the table.
Click Details to view metadata about the column.
Click Add Column Reference to manually Column Setting.
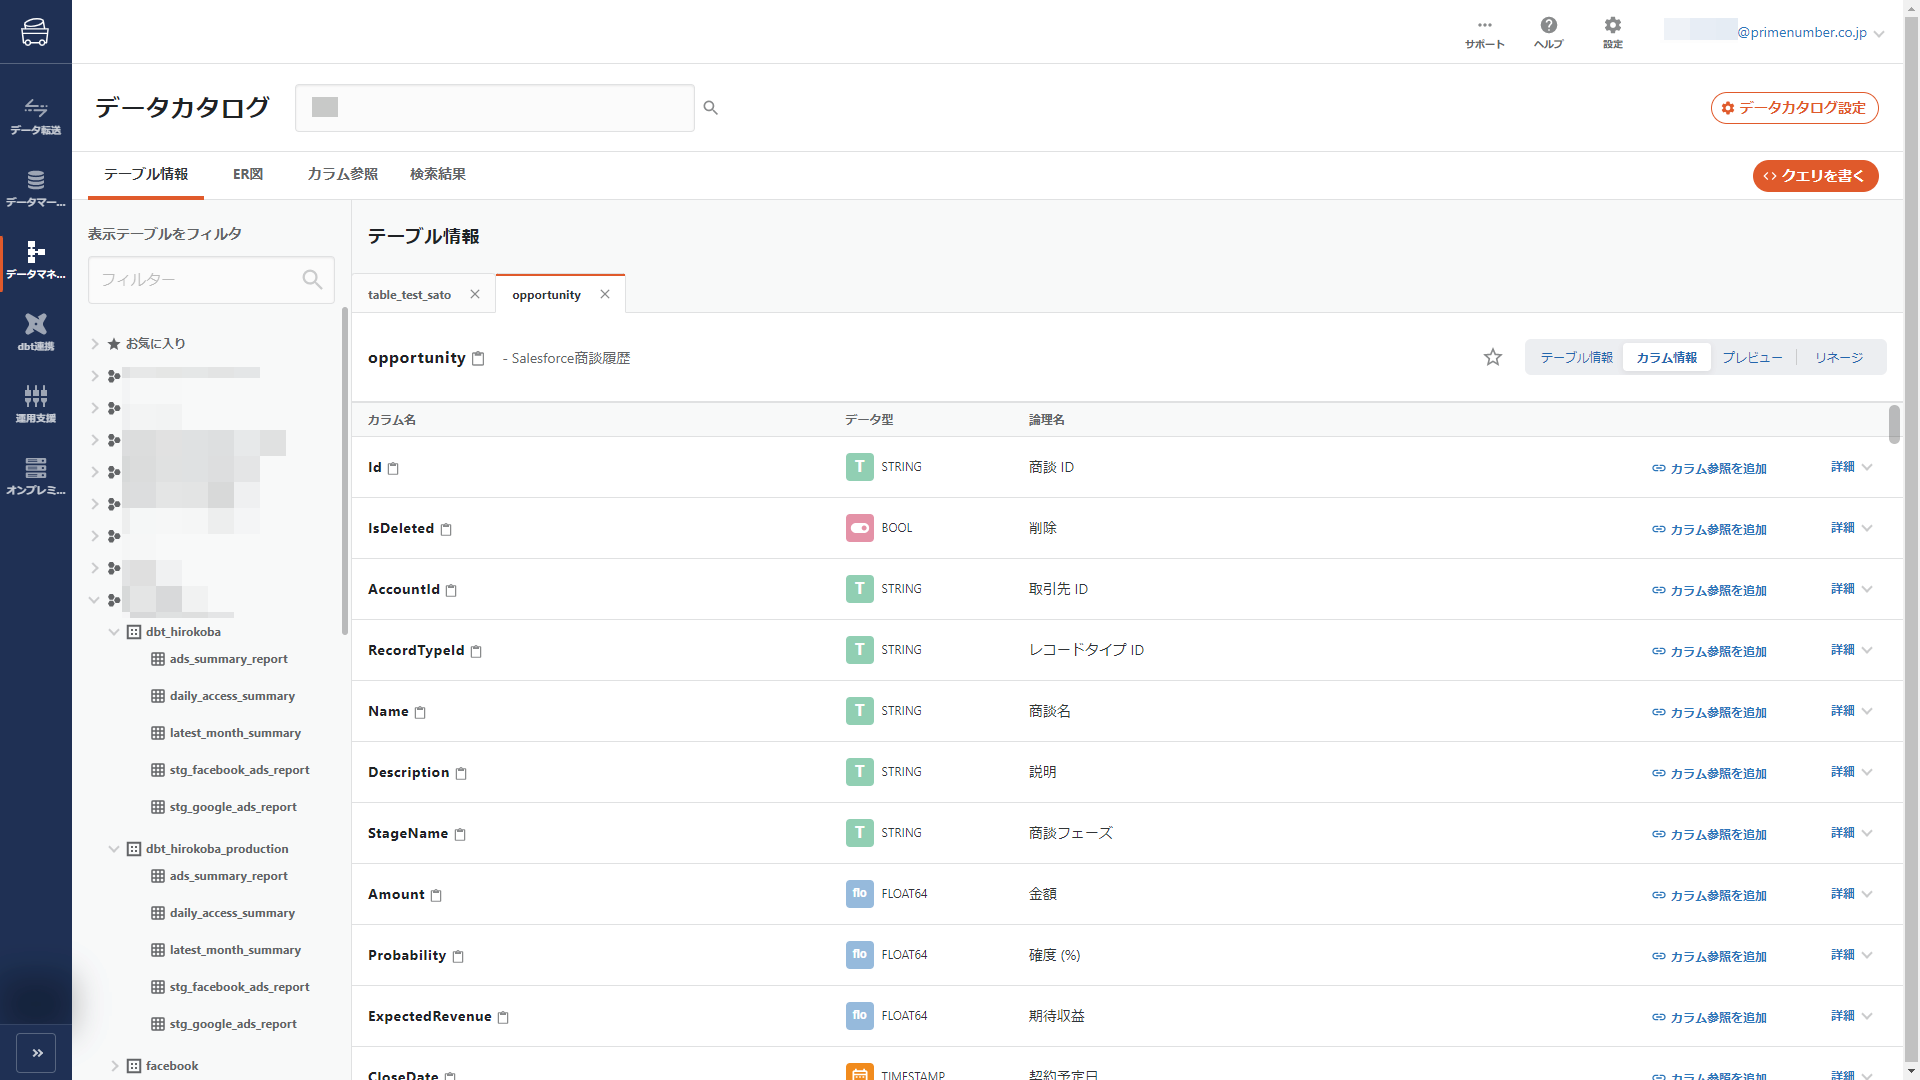
By default, three column items are displayed: column name, data type, and logical name.
The column items to be displayed in the column information can be set in the TROCCO Basic Metadata Settings.
Column Information Details
Clicking on the details of each column will display metadata about the column in question.
Summary statistics and data previews are also available.
Both summary statistics and data previews are treated as real data.
See Real Data for more information on the definition of real data and viewing privileges.
Manual Column Setting
Relationships between columns can be set manually.
Click on Add Column Reference.
Select the table and column names for which you want to set up relationships and click Create.
A column reference refers to the correspondence between columns.
Tables with Column Setting can be JOIN analyzed in the ER Diagram.
preview
Displays a preview of the table. You can also check the data type of each column and summary statistics.
Sorting and filtering functions are also supported.
Previews are treated as real data.
See Real Data for more information on the definition of real data and viewing privileges.
- Sort and filter functions cannot be combined for multiple columns.
- The filter function is not available for columns with more than 200 unique values.
- Previews cannot be displayed for BigQuery views.
- For more information about views, see View Overview.
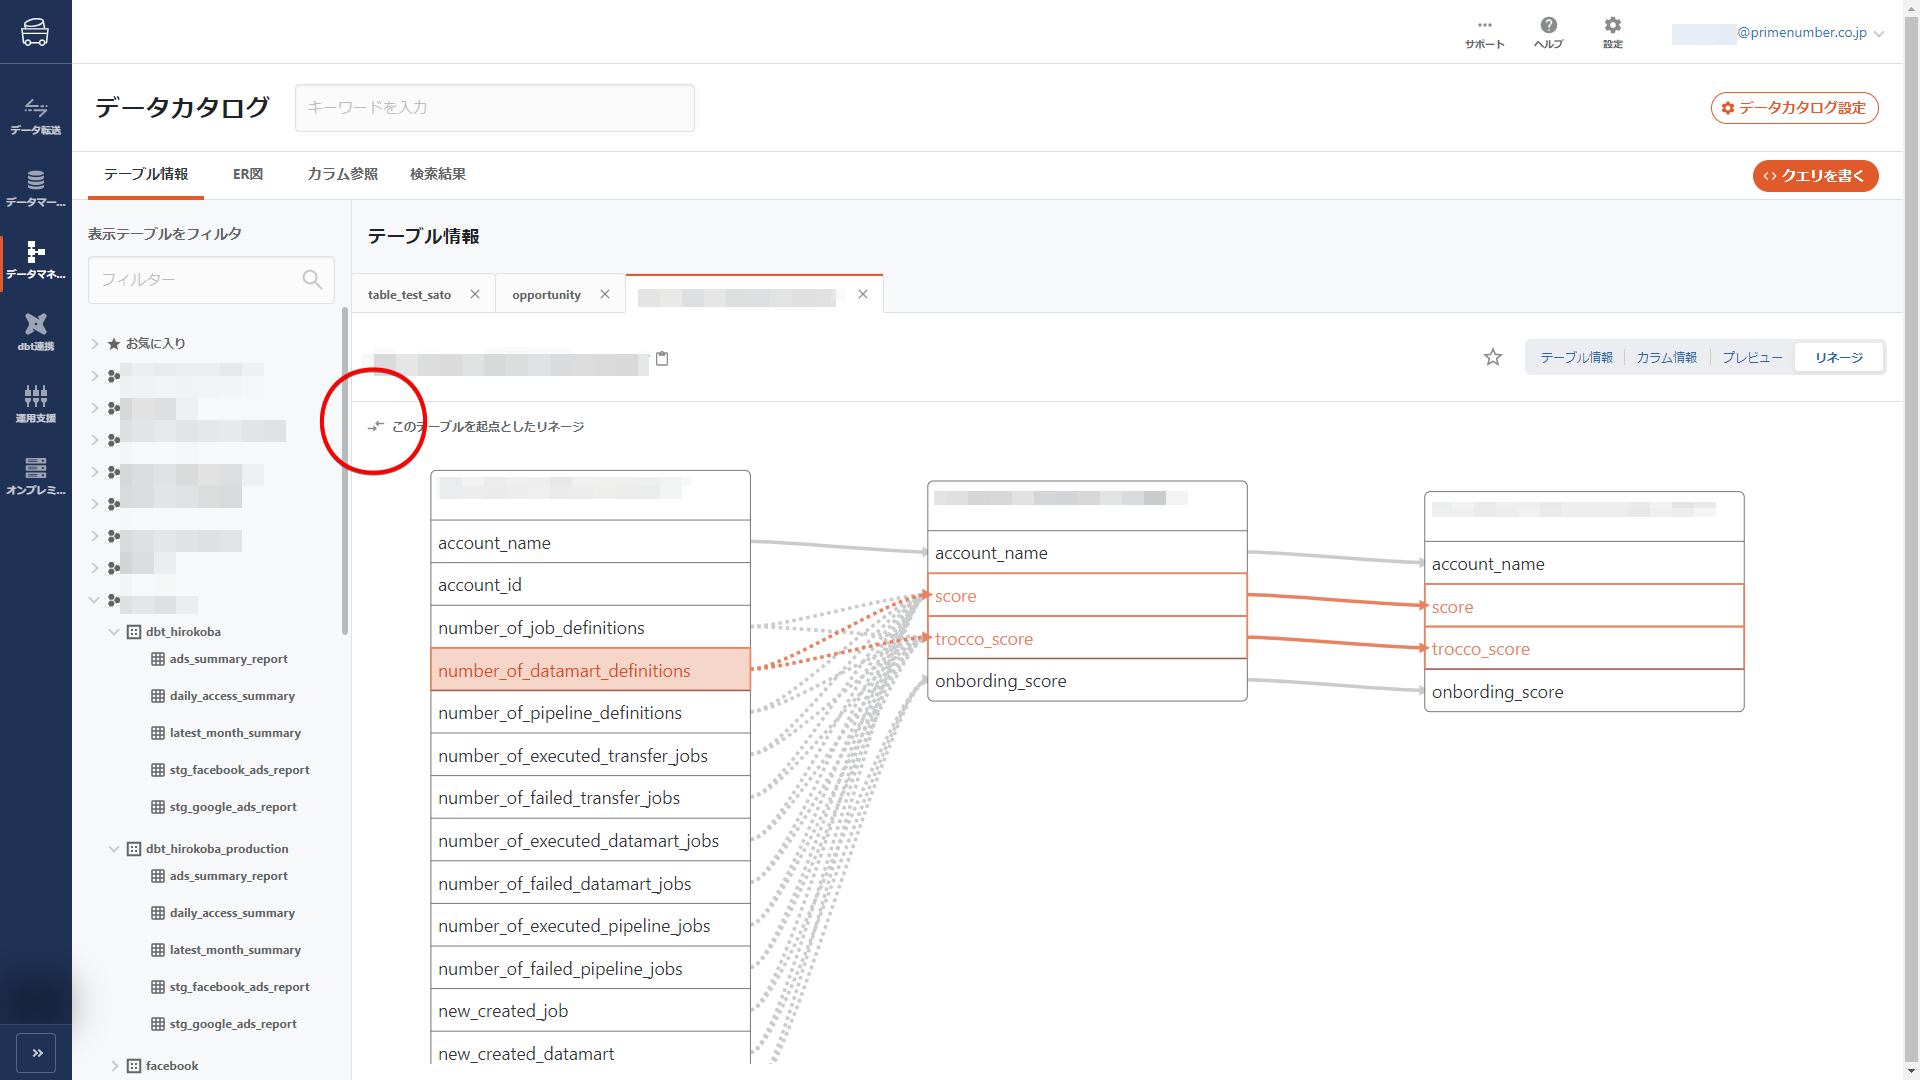
column lineage
Displays the generation path of the columns contained in the table.
Clicking on a column highlights the columns that are connected to that column and their paths.
Column linage will appear only for tables that satisfy both of the following conditions
- The table was generated using TROCCO's data mart feature.
- Data Transfer Mode is used as the query execution mode for Data Mart Configuration.
- Column linage is not displayed for tables generated using free description mode.
There are two types of lines: dotted and solid.
- A solid line means that the data was generated as is, without processing.
- A dotted line means that processed data has been generated.

By default, the linage is displayed with this table as the end point.
To switch the display to the linage starting from this table, click the icon in the red frame below.